repairing_water_damaged_walls___arch_painting_shows_you_how.html
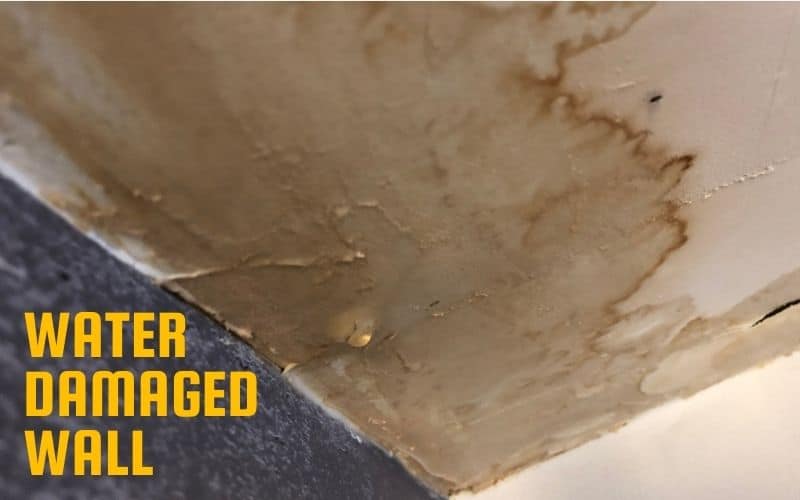
Today we were one of our clients, building and working on something that’s pretty common around this time of year. Any water damage right here, as you can see above me, but we didn’t have a fight break in their building. Now it’s fixed, and the water is being drained through, and it’s actually drying up relatively well now.
So what are we going to do to fix this and what do I need to do?
I will give you a quick walkthrough of how this is done the right way? It’s also important to show you that it looks a lot worse than it is, which can easily be fixed, either by a professional or, if you’re crafty, by yourself. So I am going to start with the prep process and I will show you some of that.
A little bit closer go from there, alright, so the first step right most important parts process is Brett long wall do piers, take off any hese compounds yeah bouncing a powder up pretty easily after tribal language, because it has, I mean a lot of damage: resistance to atmosphere environment like that pretty simple, then, once you do that we dont like that habits of sandpaper lets, show you whats going to come off. Whats to be expected, what its going to look like after for the record here, reverse just to get down to a sound.
We dont ant is to be cutting into the drywall paper, really so were kind of go care for your scraper you’re. Doing this yourself and you’re go worried, maybe use a plastic putty knife, something like this. Perhaps so were just gon na keep going. You got little bits of drywall paper that have already been exposed on top dont drop lockdown. For this too, because just kind of comes backwards. It yeah were not trying to dig too too hard here want to get something that’s, not often that we can also watch that pain, you’re talking joints, you’re banging those are split.
Cracks rip that out to buy a new copy and in the process stop that for now were gon na give it a light sanding just to see why lets we have to kind of move around and work with so already just looking much better, we didnt sand That you might not know so that gon na be scraped or same thing with one here about this lot of this ones to go so let it go back, see that edge now blends in really well.
So this is looking pretty good were just gon na make sure its good dry not wet still in some cases, you’re gon na actually want to prime this first, if you’re noticing a lot of discoloration and I think were probably in the door had to do that so well. Show you how we come out prep this whole thing. It will come back and start showing you up some of the money process a little bit.
So we pulled back a little bit here to show you guys wider shot of what I just explained in the prep process. Right now were starting to do the mudding. If you notice before you could see the guy putting some mesh tape on a large crack, you’re gon na want to mesh tape any large cracks any big holes. You see, you’re going to want to use a metal mesh screen.
Belen a paint store place that up and start putting your mud down. On top of that here, you’re seeing the guys starting to mud con. One of the larger areas in this case were using easy sand 45, but you could easily use pre-mixed lightweight joint compound trick when mudding here is you’re not trying to get too heavy you dont need to mud in one shot.
You can let it dry and sand it out a little bit more and then put other layers of mud on top of that, and sand, though, is its going to end up with a finished result as opposed to trying to mud it in one shot. Youre gon na have some cratering stuff like that, in this case, you’re gon na want to use the biggest play knife that you can for the air you’re doing so something like this, where you’re doing some larger areas, a six inch knife is really good and you’re. Just going to want to try to smooth out as best you can, a lot of this can be taken care of
During a sanding process, we are not going to be showing you the mud drying because that’s no fun and were not really going to show you in the sanding its pretty self-explanatory, theyre just sand until its smooth and watching guys sands about as interesting and watching paint Dry once you’re sanded, smooth, now you’re ready to priming paint just like it was a normal wall area. So now we got some shots of the finished project and you know everything came out nice and smooth.
This also was a really quick turnaround. We were able to get in and out here in a day and get this place completely operational and looking great. So if its something you dont want to, do yourself, give us a call check us out on all social media and stay tuned for more of our how-to videos, thanks for watching
